Get Started with Dgraph - Basic Operations
Welcome to the second tutorial of getting started with Dgraph.
In the previous tutorial of getting started, we learned some of the basics of Dgraph. Including how to run the database, add new nodes and predicates, and query them back.
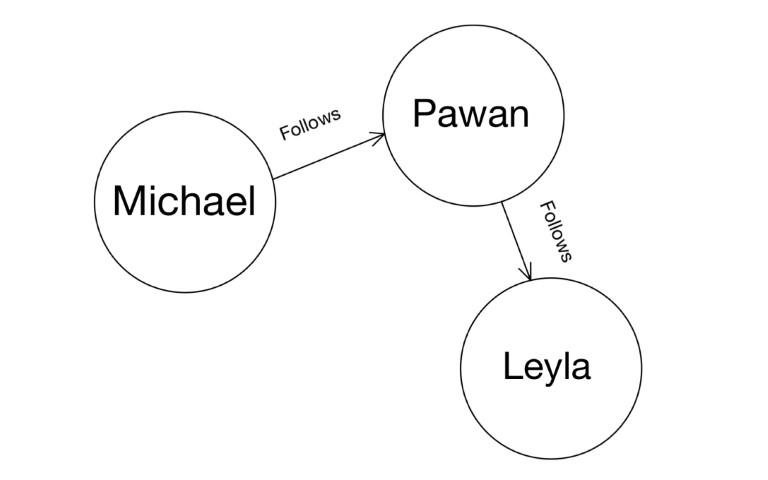
In this tutorial, we’ll build the above Graph and learn more about operations using the UID (Universal Identifier) of the nodes. Specifically, we’ll learn about:
- Querying and updating nodes, deleting predicates using their UIDs.
- Adding an edge between existing nodes.
- Adding a new predicate to an existing node.
- Traversing the Graph.
You can see the accompanying video below.
First, let’s create our Graph.
Go to Ratel’s mutate tab, paste the mutation below in the text area, and click Run.
{
  "set":[
    {
      "name": "Michael",
      "age": 40,
      "follows": {
        "name": "Pawan",
        "age": 28,
        "follows":{
          "name": "Leyla",
          "age": 31
        }
      }
    }
  ]
}
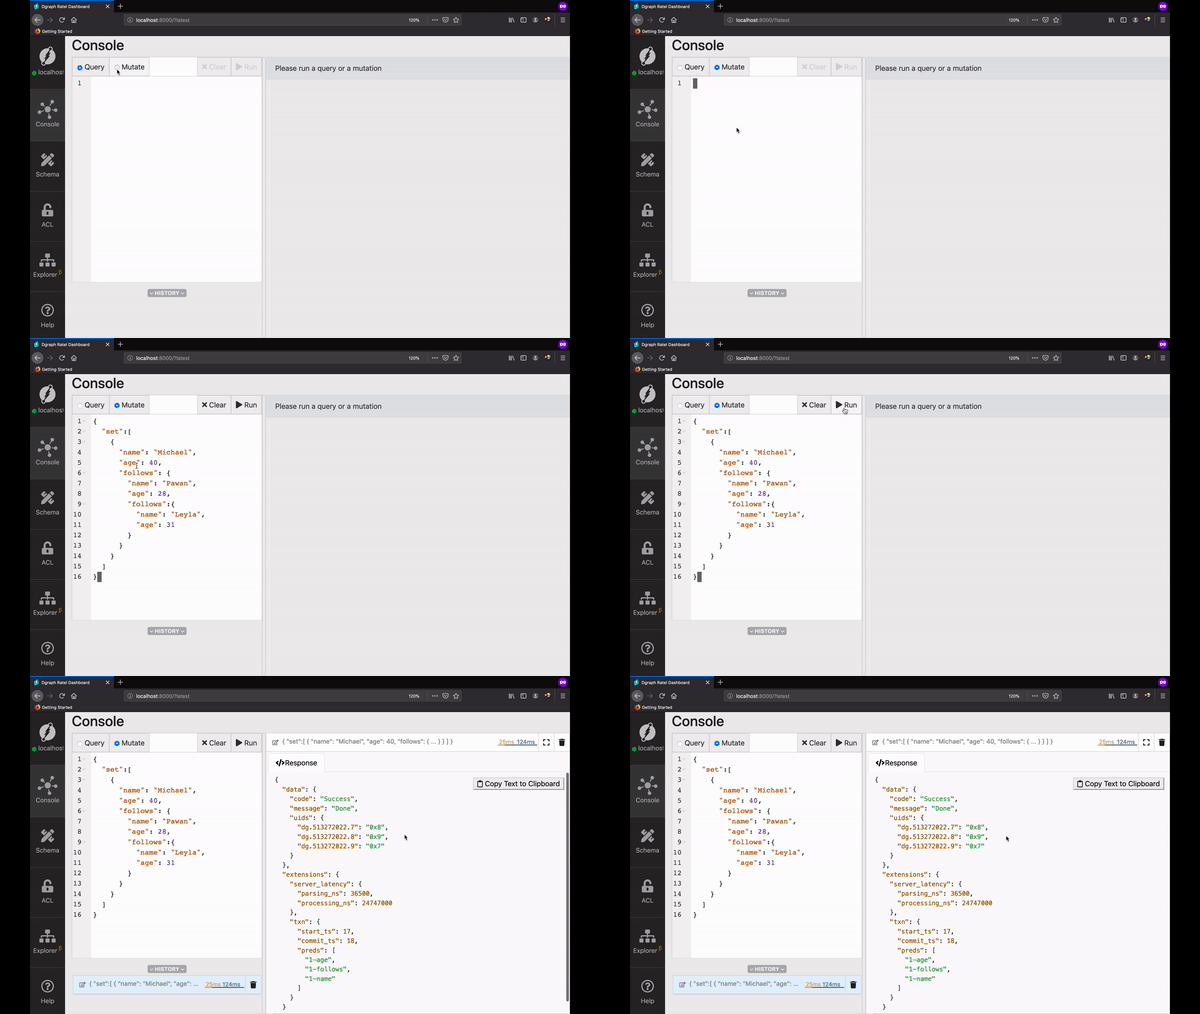
Query using UIDs
The UID of the nodes can be used to query them back. The built-in function uid takes a list of UIDs as a variadic argument, so you can pass one (e.g. uid(0x1)) or as many as you need (e.g. uid(0x1, 0x2)).
It returns the same UIDs that were passed as input, no matter whether they exist in the database or not. But the predicates asked will be returned only if both the UIDs and their predicates exist.
Let’s see the uid function in action.
First, let’s copy the UID of the node created for Michael.
Go to the query tab, type in the query below, and click Run.
{
  people(func: has(name)) {
    uid
    name
    age
  }
}
Now, from the result, copy the UID of Michael’s node.
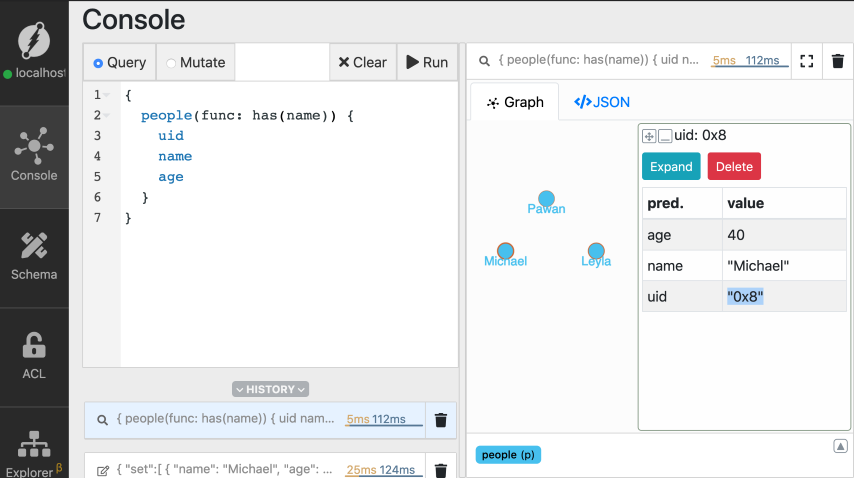
In the query below, replace the placeholder MICHAELS_UID with the UID you just copied, and run the query.
{
    find_using_uid(func: uid(MICHAELS_UID)){
        uid
        name
        age
    }
}
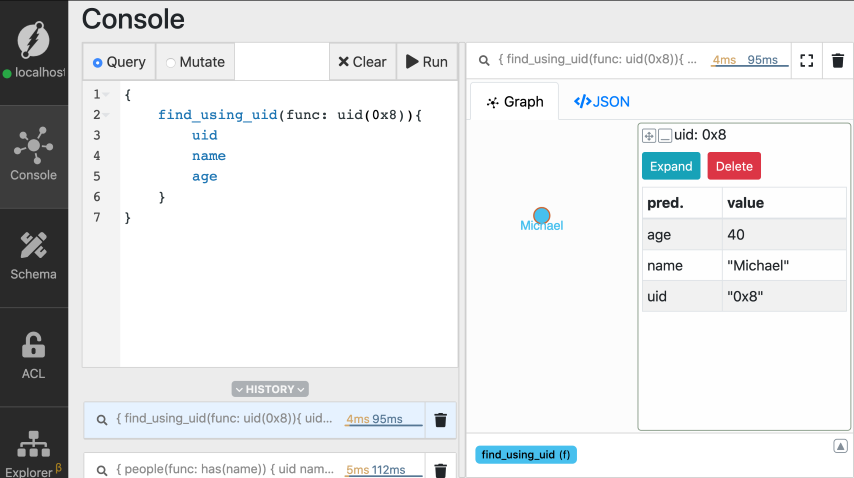
Note: MICHAELS_UID appears as 0x8 in the images. The UID you get on your machine might have a different value.
You can see that the uid function returns the node matching the UID for Michael’s node.
Refer to the previous tutorial if you have questions related to the structure of the query in general.
Updating predicates
You can also update one or more predicates of a node using its UID.
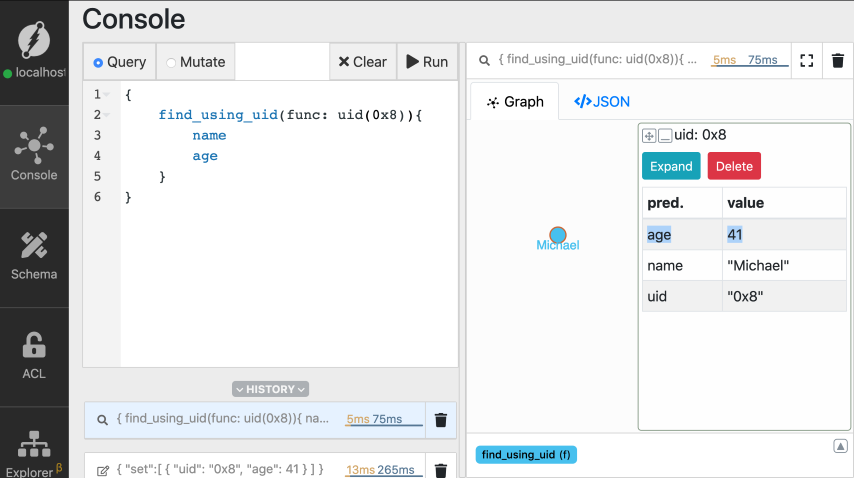
Michael recently celebrated his 41st birthday. Let’s update his age to 41.
Go to the mutate tab and execute the mutation.
Again, don’t forget to replace the placeholder MICHAELS_UID with the actual UID of the node for Michael.
{
  "set":[
    {
      "uid": "MICHAELS_UID",
      "age": 41
    }
  ]
}
We had earlier used set to create new nodes.
But on using the UID of an existing node, it updates its predicates, instead of creating a new node.
You can see that Michael’s age is updated to 41.
{
    find_using_uid(func: uid(MICHAELS_UID)){
        name
        age
    }
}
Similarly, you can also add new predicates to an existing node.
Since the predicate country doesn’t exist for the node for Michael, it creates a new one.
{
  "set":[
    {
      "uid": "MICHAELS_UID",
      "country": "Australia"
    }
  ]
}
Adding an edge between existing nodes
You can also add an edge between existing nodes using their UIDs.
Let’s say, Leyla starts to follow Michael.
We know that this relationship between them has to represented by creating the follows edge between them.
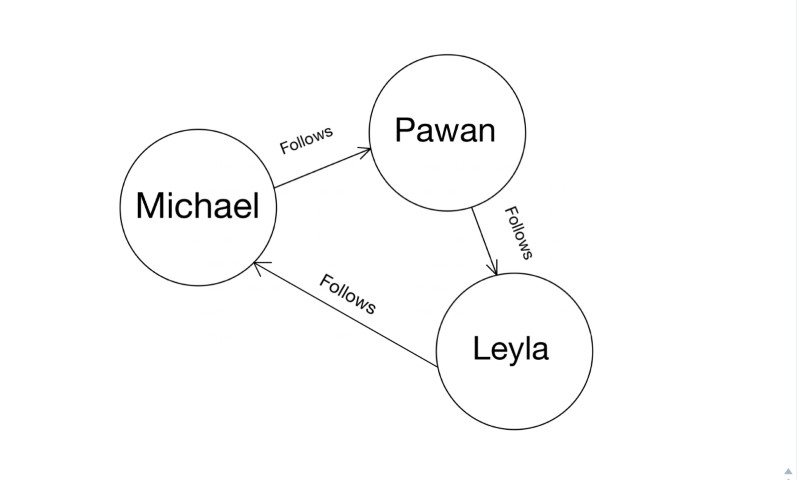
First, let’s copy the UIDs of nodes for Leyla and Michael from Ratel.
Now, replace the placeholders LEYLAS_UID and MICHAELS_UID with the ones you copied, and execute the mutation.
{
  "set":[
    {
      "uid": "LEYLAS_UID",
      "follows": {
        "uid": "MICHAELS_UID"
      }
    }
  ]
}
Traversing the edges
Graph databases offer many distinct capabilities. Traversals are among them.
Traversals answer questions or queries related to the relationship between the nodes.
Hence, queries like, who does Michael follow?
are answered by traversing the follows relationship.
Let’s run a traversal query and then understand it in detail.
{
    find_follower(func: uid(MICHAELS_UID)){
        name
        age
        follows {
          name
          age
        }
    }
}
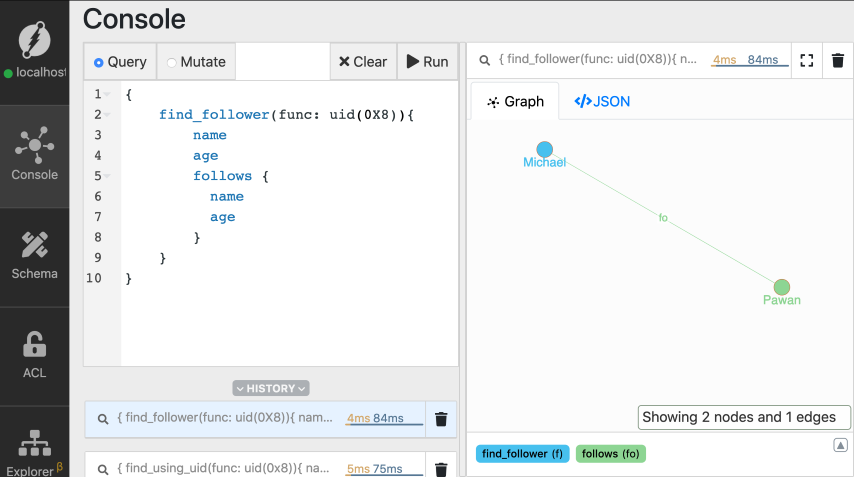
Here’s the result.
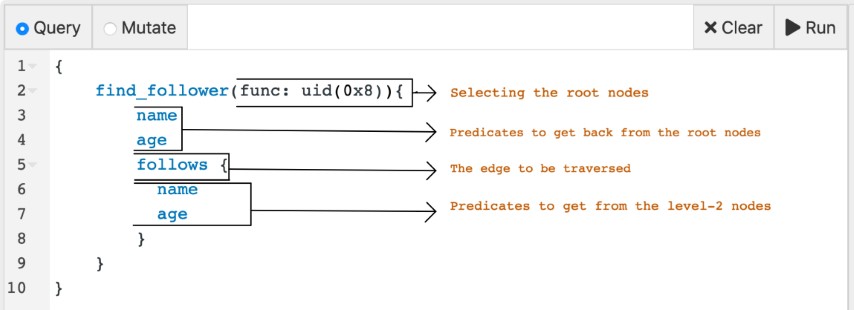
The query has three parts:
- Selecting the root nodes.
First, you need to select one or more nodes as the starting point for traversals.
These are called the root nodes.
In the query above, we use the uid() function to select the node created for Michael as the root node.
- Choosing the edge to be traversed
You need to specify the edge to be traversed, starting from the selected root nodes. And then, the traversal, travels along these edges, from one end to the nodes at the other end.
In our query, we chose to traverse the follows edge starting from the node for Michael.
The traversal returns all the nodes connected to the node for Michael via the follows edge.
- Specify the predicates to get back
Since Michael follows only one person, the traversal returns just one node.
These are level-2 nodes. The root nodes constitute the nodes for level-1.
Again, we need to specify which predicates you want to get back from level-2 nodes.
You can extend the query to make use of level-2 nodes and traverse the Graph further and deeper.
Let’s explore that in the next section.
Multi-level traversals
The first level of traversal returns people followed by Michael. The next level of traversal further returns the people they in-turn follow.
This pattern can be repeated multiple times to achieve multi-level traversals. The depth of the query increases by one as we traverse each level of the Graph. That’s when we say that the query is deep!
{
  find_follower(func: uid(MICHAELS_UID)) {
    name
    age
    follows {
      name
      age
      follows {
        name
        age
      }
    }
  }
}
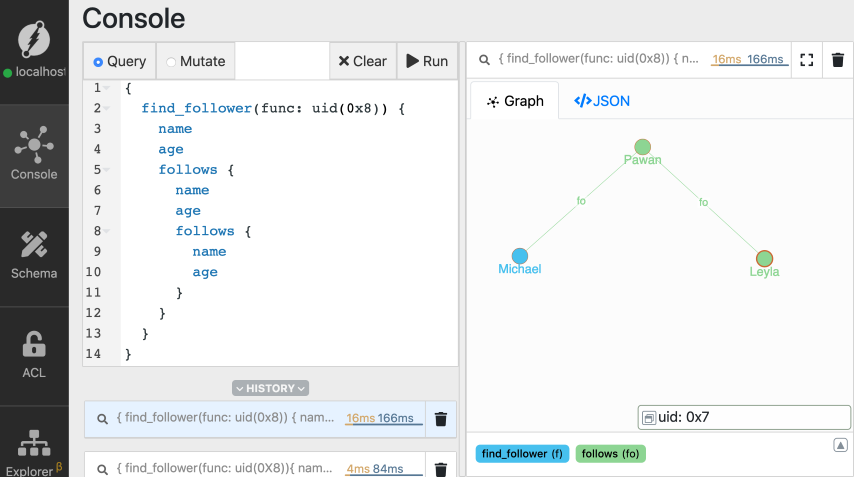
Here is one more example from the extension of the last query.
{
  find_follower(func: uid(MICHAELS_UID)) {
    name
    age
    follows {
      name
      age
      follows {
        name
        age
        follows {
          name
          age
        }
      }
    }
  }
}
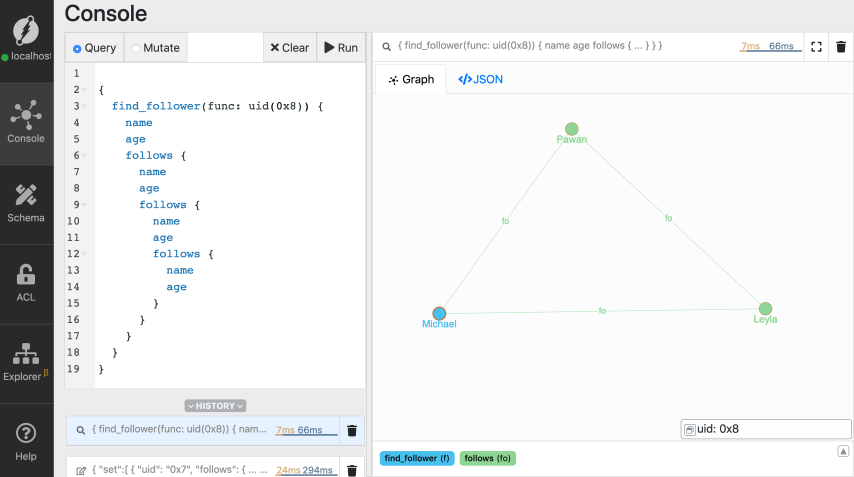
This query is really long! The query is four levels deep. In other words, the depth of the query is four. If you ask, isn’t there an in-built function that makes multi-level deep queries or traversals easy?
The answer is Yes!
That’s what the recurse() function does.
Let’s explore that in our next section.
Recursive traversals
Recursive queries makes it easier to perform multi-level deep traversals. They let you easily traverse a subset of the Graph.
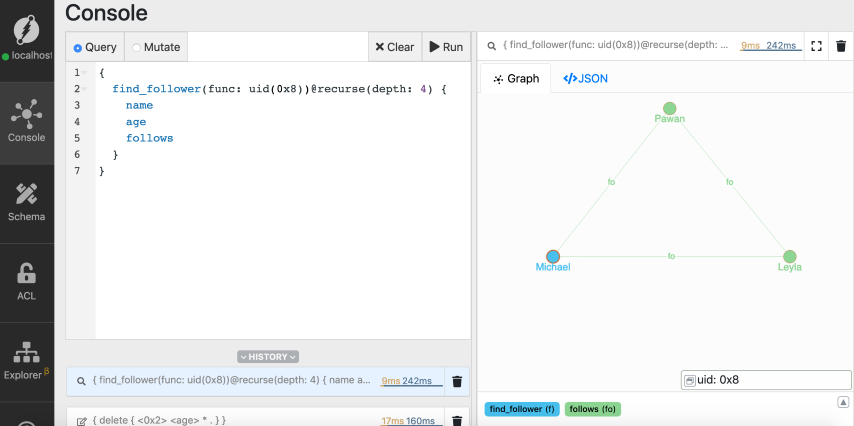
With the following recursive query, we achieve the same result as our last query. But, with a much better querying experience.
{
  find_follower(func: uid(MICHAELS_UID)) @recurse(depth: 4) {
    name
    age
    follows
  }
}
In the query above, the recurse function traverses the graph starting from the node for Michael.
You can choose any other node to be the starting point.
The depth parameter specifies the maximum depth the traversal query should consider.
Let’s run the recursive traversal query after replacing the placeholder with the UID of node for Michael.
Check out the docs for detailed instructions on using the recurse directive.
Edges have directions
Edges in Dgraph have directions.
For instance, the follows edge emerging from the node for Michael, points at the node for Pawan.
They have a notion of direction.
Traversing along the direction of an edge is natural to Dgraph. We’ll learn about traversing edges in reverse direction in our next tutorial.
Deleting a predicate
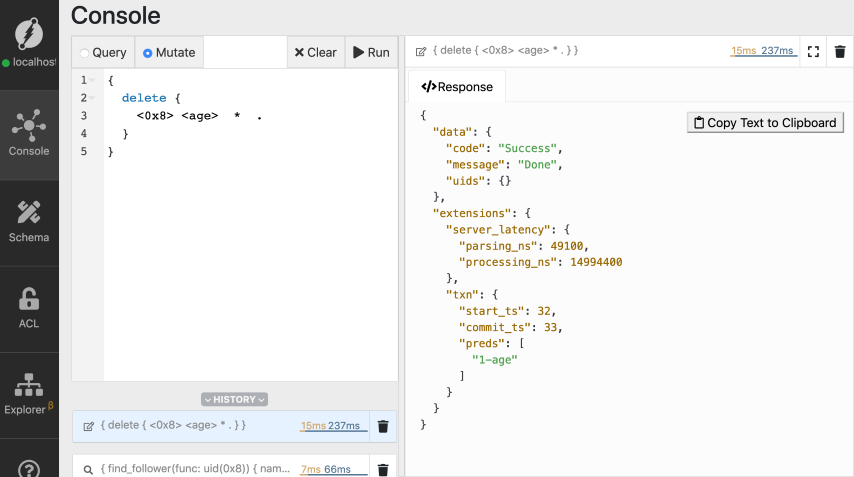
Predicates of a node can be deleted using the delete mutation.
Here’s the syntax of the delete mutation to delete any predicate of a node,
{
    delete {
        <UID> <predicate_name> * .
    }
}
Using the mutation syntax above, let’s compose a delete mutation.
Let’s delete the age predicate of the node for Michael.
{
  delete {
    <MICHAELS_UID> <age> * .
  }
}
Wrapping up
In this tutorial, we learned about the CRUD operations using UIDs.
We also learned about recurse() function.
Before we wrap, here’s a sneak peek into our next tutorial.
Did you know that you could search predicates based on their value?
Sounds interesting?
Check out our next tutorial of the getting started series here.
Need Help
- Please use discuss.dgraph.io for questions, feature requests, bugs, and discussions.